Postingan

Menampilkan postingan dari April, 2013

How To Make Sparate Box Posts in Blogger

Gambar
In this tutorial, we're going to divide (separate) our posts in boxes (frames), so each post will have it's own "house", and you'll be able to see background between them. See below what I'm blabing about: Ok. You should keep in mind : ► this is the example for the Blogs that already have a customized (stylized) Post area ► this example was made in Minima Blogger template (so your code may be a bit different, but the procedure is the same) ► it doesn't matter if you have "heavily" customized template, you can apply these setting anyway UNDERSTAND THIS .... main-wrapper defines the Post area in Blogger Template. The whole idea here is to copy the style of main-wrapper , and to apply it to elements inside of it. ....now, the whole section of "main-wrapper" looks like this (in my example): #main-wrapper { background:#FFDEAD; border: 1px solid #E9967A; padding-right:7px; padding-left:7px; width: 410px; float: $startSide; word-wr

How To Remove Showing Posts With Labels Blogger

Gambar
Here's one more thing which folks find irritating. Or unnecessary. When you click on one of your labels, blogger filters your posts tagged with that particular label. That's great, but we don't need a big box saying the same thing. If you like it though, even better. But maybe your readers don't... So, if you want to remove it, follow me. It's an easy one. Log in to your Blogger account, Back-up your template, then go to: DASHBOARD -- LAYOUT -- EDIT HTML -- hit EXPAND WIDGET TEMPLATES , find the following part of code: <b:includable id='status-message'> <b:if cond='data:navMessage'> <div class='status-msg-wrap'> <div class='status-msg-body'> <data:navMessage/> </div> <div class='status-msg-border'> <div class='status-msg-bg'> <div class='status-msg-hidden'><data:navMessage/></div> </div> </div> </div> <div style='c

Border In Blogger

Gambar
In Blogger default templates (like Minima ), you can see that all kinds of borders are present. Borders around header, borders between posts and sidebar gadgets. In the control menu, Fonts and colors , we are allowed just to change the color of the border. But there's so much more to it.... First, let's check the styles for the borders that we can use: none : no border at all dotted : series of dots. dashed : series of short line segments. solid : single line segment. Double: two solid lines. Groove: 'carved' into the canvas. ridge : like it is coming out of the canvas. inset : like it is embedded in the canvas. outset : like it is coming out of the canvas. HOW TO CHANGE MY BORDER? To make any kind of changes, you have to go to: DASHBOARD ► LAYOUT ► EDIT HTML, and find the code that corresponds to the borders: border:1px solid $bordercolor; ...your code (CSS style) may be a bit different, (this is example for Minima default templa

How To Sparate Gadget Sidebar Blogger

Gambar
You should keep in mind : ► this is the example for the Blogs that already have a customized (stylized) Sidebar (colorized, borderized..) ► this example was made in Minima Blogger template (so your code may be a bit different, but the procedure is the same) ► it doesn't matter if you have "heavily" customized template, you can apply these setting anyway UNDERSTAND THIS We have to imitate the main style of our sidebar-wrapper (the one that carries the style for the whole sidebar element), and apply it to individual widgets (gadgets). Here's the style of the sidebar-wrapper in this example: #sidebar-wrapper { background:#ADD8E6; border: 1px solid #E9967A; width: 220px; float: $endSide; word-wrap: break-word; /* fix for long text breaking sidebar float in IE */ overflow: hidden; /* fix for long non-text content breaking IE sidebar float */ } ...the styles we're interested in here are: background and border ...next is to apply this to our widgets... Ok, LE

How To Make Cool Widget Blogger

Gambar
How to tweak and style each widget (gadget) differently! Meaning: ► each of your widgets (Labels, Archive, Links, custom widget) can have it's own looks (color, font, borders, images....anything!) ► remember that WIDGET is the same thing as GADGET Ok, here's the simple example: I've chosen to differ my widgets a bit, so I changed a the style of Labels , Links , Archive and Picture widget. I choose these widgets just for this example. Remember that you can do this with every other widget too!  There are a few simple steps you'll have to take: ► choose which widget you'd like to style, and identify it in Blogger HTML code ► add some CSS style in the code that will spice up our widget ► don't lose your marbles (be patient and creative) Choosing and Identifying Each widget added in Blogger Layout has a unique ID. We will use this ID to apply some style to our widget. So, our job is to dive into the Blogger HTML code, and locate these ID's. Let's

How Add Icon Beside Sidebar Title Blogger

Gambar
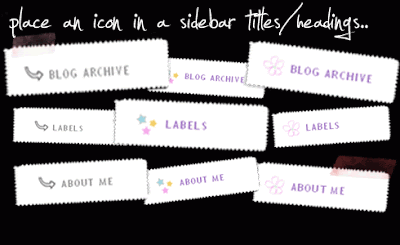
This time, we'll learn how to place a small icon or picture right beside the Sidebar widget/gadget title.Now, we want to achieve this: There are 4 steps to get this working: 1. Find the icon (picture) you like, optimize it 2. Upload the pic to a free web host (to get the URL) 3. Make a CSS style for the sidebar headings (titles) 4. Play with the CSS style (customize) *** 1. This is a fun part. Find the pic (icon) you like, design one, crop it, cut it, color it.....Two things you should take care of: ► size of the icon - keep them small, like 25x25 px...This is not a rule, and the ratio is not important (you can make 25x10px..). Trial and error. You'll get it... ► transparent pic or not? - I suggest NOT to use transparent pics. Rather make a pic with a background that has same color as your sidebar background color (so they blend together). Transparency is great, but older Internet Explorer browsers do not display them properly. And lots of folks out there are using

How Modify Footer Columns Blogger

Gambar
In the article "How to add columns to Blogger Footer" we've learned about the basic (barebone) implementation of extra columns in Blogger footer. This time, we'll try to customize them a bit. This is optional, of course. You will learn how to: ► control the style of your new footer ► add some colors to it ► change the link color (footer links can be in different color than the main link color) ► customize links ► change the headings style.... In the first tutorial , you've placed a CSS style + some HTML. Now, all we're going to do is a simple play (tweak) in CSS (style). If you're ready, let's do this.... ADDING BORDERS The simplest thing to do, but can produce a great effect. By default, you have a top border (1px dotted) that divides footer from the content area. You can change the border style in this part of CSS: #footer-columns { border-top:1px dotted #999999; clear:both; margin:0 auto; } ...tweaking the line in pink . Options: border: 1px dot

How Add Columns Blogger Footer

Gambar
We are going to add some columns to our Blogger Footer. If you're using one of the Blogger default templates, you've noticed that in your Footer section, you only have a horizontal Add a Gadget element that has the same width like the Blog. We can do better. Let's start with adding 3 columns in the footer, and place the default one on the bottom. Advantages: ► you can place more widgets (gadgets) ► rearrange them as you want ► your main content area will load faster if you place your "biggest" widgets on the bottom Ok, let's do this. This time, you'll just have to Copy-Paste . It's a 7 min job. Before you begin, do back up your template (1 minute). 1. If you already have some widgets (gadgets) in the Footer , remove them: LAYOUT ► check if you have gadgets in the footer ► if you do, click on Edit and ► Remove or, just "drag" them in the Sidebar . You'll get them back in place when you integrate the Footer columns. 2. Go to LAYOUT ► E

Move Date Under Posts Title Blogger

Gambar
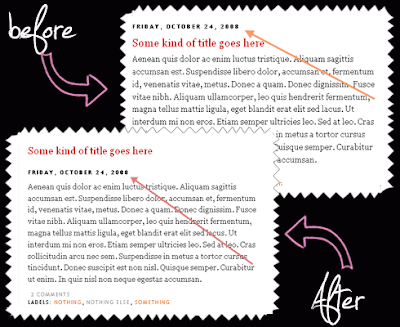
In this tutorial we'll learn how to move (change the position) of the Date in Blogger. We will move it UNDER (below) the Post Title (by default, it's ABOVE it). We'll have to tweak the HTML code a bit. Until Blogger provides automated way of doing this....And I hope it will. If you're ready, let's do it. First thing is backing up your Blogger template. I'll show you 2 ways of doing this. I suggest to follow the example 1 . If you'll have problems, then try with example 2 . 1. Go to: DASHBOARD ► LAYOUT ► EDIT HTML ► click on Expand widget templates in the upper right corner. Locate the following part of code: <b:if cond='data:post.dateHeader'> <h2 class='date-header'><data:post.dateHeader/></h2> </b:if> ...CUT it, and paste into Notepad (windows) or TextEdit (Mac).. Now, you have to find this part of the code: <b:if cond='data:post.title'> <h3 class='post-title entry-title'> <

Customization Posts Title Blogger

Gambar
How to customize your blogger Posts Title ...we can add some background picture behind the post title, or borders, change font...........................well, a lot. Before doing any customization, back up your template. Just in case.... Let's start with the beginning. Heh. For customization, we will use the CSS style in the code section that corresponds to our Post Title : .post h3 { margin:.25em 0 0; padding:0 0 4px; font-size:140%; font-weight:normal; line-height:1.4em; color:$titlecolor; } ..... Attention: this example is made in Minima Blogger default template, so your actual code may differ a bit it's important to find the part ".post h3", or if you have custom template, the find the part that "carries" the style for your Post Title... It's also important to know the width of your Post Title area, which is basically the same as your Post Content area ("main-wrapper" by default). This information, you'll find in this part of code:

Customization Sidebar Blogger

Gambar
In this tutorial, I'll explain how to customize Sidebar Titles in Blogger. How to change their clothes. By default, they are kind of "naked" and empty. But there's a lot that can be done. We can give them some background color, even a picture, an icon beside them, borders, lines...... WHAT CAN WE DO IN BLOGGER OPTIONS? Well, not much. You can change the Font C o l o r of the title, Size , weight and Font family . But in some templates (like Minima ), the Date Title (above posts) has the same style like Sidebar title . That means - the same changes you make in sidebar titles, also applies on Date title . Which ain't nice. But if this works for you, and you don't need more, go to LAYOUT --> FONTS AND COLORS , and adjust these settings as you like.... !! Before doing anything from the options below, back up your template !! (it takes a minute...) Now, here's the part of code we will modify (it may look a bit different in your template, but it

Add Image To Labels Blogger

Gambar
This way, you can make your Blogger XML template Links (Labels and all other links) look nicer. Or not. Depends what you like. So here's what you have to do. This is an example, and remember, you can add whatever picture you like. Also take this one, if you like it... We've added the black arrow to our labels to make them distinguish a bit more. First, you have to prepare your picture (icon, image). Choose the one you like, but keep in mind: keep the pics small size 15 x 15 (px). smaller is also alright .... save your pics as ".png" files when you edit them in editor (so they blend with template background) you don't have to use " .png" format if the background of icon (picture) is the same color as your template background upload your picture to a free web host services ( Photobucket , Picasa , TinyPic ...) Ok. Now the codes. Back up your template. Then go to: DASHBOARD ► LAYOUT ► EDIT HTML ► find the following part of code: .sidebar ul { list-sty

Add Icon In Posts Footer Blogger

Gambar
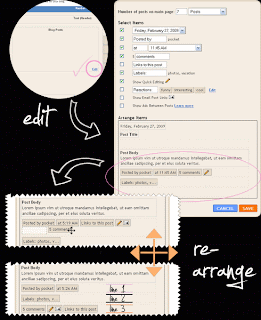
We're going to spice up our Blogger Post Footer a bit. We'll do this by rearranging post footer elements (Labels, Posted by, Email this posts, Comment Link..) and adding an web icon to each. Few notes: ► the example is made in default Blogger Minima template, and the tutorial is quite easy if you're using this template ► if you're using some other default Blogger template, this tutorial will also work, but you'll have to adjust some things (maybe) ► if you are using a third-party customized template, this will work ONLY if you understand how this is done (basically, you'll have to identify your element's ID, and add some CSS style for each) REARRANGING ELEMENTS Blogger Post Footer is divided in 3 rows. Go to: LAYOUT ► PAGE ELEMENTS ► click on Edit in BLOG POSTS box. There, you can see your Post options. On the bottom, you can see 3 rows in Post Footer and elements in them. For this example, I've activated: ► Links to this Post and ► Show Email

Remove Elements In Posts Blogger

Gambar
In this tutorial we're going to identify the code of each element in default Blogger XML templates (new Blogger Beta). The reason we do this: ► because we'd like to rearrange the elements in post footer (divide them, change positions) ► move one (or more) of the elements somewhere else (like: under the Post Title) REARRANGING ELEMENTS You can rearrange Post footer elements without tweaking the code: DASHBOARD ► LAYOUT ► PAGE ELEMENTS click on Edit in BLOG POSTS box: If this works for you, great! But, lots of times, you CAN rearrange the elements by "dragging" them around, and they will seem to be rearranged, and when you go check your Blog - NOTHING has changed! You can solve this with: ► with clearing your cache (if you're lucky) ► by manually rearranging the elements in HTML code If you're ready, let's go visit the HTML of our template.... Before making any changes to your code, I suggest to back up the current Blogger layout . Then go to: LAYOUT ►